# ActionMailer
Action Mailer allows you to send emails from your application using mailer classes and views. Mailers work very similarly to controllers. They inherit from ActionMailer::Base and live in app/mailers, and they have associated views that appear in app/views.
# Basic Mailer
This example uses four different files:
- The User model
- The User mailer
- The html template for the email
- The plain-text template for the email
In this case, the user model calls the approved method in the mailer and passes the post that has been approved (the approved method in the model may be called by a callback, from a controller method, etc). Then, the mailer generates the email from either the html or plain-text template using the information from the passed-in post (e.g. the title). By default, the mailer uses the template with the same name as the method in the mailer (which is why both the mailer method and the templates have the name 'approved').
# user_mailer.rb
class UserMailer < ActionMailer::Base
  default from: "donotreply@example.com"

  def approved(post)
      @title = post.title
      @user = post.user
      mail(to: @user.email, subject: "Your Post was Approved!")
  end
end
# user.rb
def approved(post)
    UserMailer.approved(post)
end
# approved.html.erb
<!DOCTYPE html PUBLIC "-//W3C//DTD HTML 4.01 Transitional//EN" "http://www.w3.org/TR/html4/loose.dtd">
<html>
    <head>
      <meta http-equiv="Content-Type" content="text/html; charset=utf-8">
      <title>Post Approved</title>
    </head>
    <body>
        <h2>Congrats <%= @user.name %>! Your post (#<%= @title %>) has been approved!</h2>
        <p>We look forward to your future posts!</p>
    </body>
</html>
# approved.text.erb
Congrats <%= @user.name %>! Your post (#<%= @title %>) has been approved!
We look forward to your future posts!
# Generating a new mailer
To generate a new mailer, enter the following command
rails generate mailer PostMailer
This will generate a blank template file in app/mailers/post_mailer.rb named PostMailer
class PostMailer < ApplicationMailer
end
Two layout files will also be generated for the email view, one for the html format and one for the text format.
If you prefer not to use the generator, you can create your own mailers. Make sure they inherit from ActionMailer::Base
# Adding Attachments
ActionMailer also allows attaching files.
attachments['filename.jpg'] = File.read('/path/to/filename.jpg')
By default, attachments will be encoded with Base64. To change this, you can add a hash to the attachments method.
attachments['filename.jpg'] = {
  mime_type: 'application/gzip',
  encoding: 'SpecialEncoding',
  content: encoded_content
}
You can also add inline attachments
attachments.inline['image.jpg'] = File.read('/path/to/image.jpg')
# ActionMailer Callbacks
ActionMailer supports three callbacks
- before_action
- after_action
- around_action
Provide these in your Mailer class
class UserMailer < ApplicationMailer
  after_action :set_delivery_options, :prevent_delivery_to_guests, :set_business_headers
Then create these methods under the private keyword
private
  def set_delivery_options
  end

  def prevent_delivery_to_guests
  end

  def set_business_headers
  end
end
# ActionMailer Interceptor
Action Mailer provides hooks into the interceptor methods. These allow you to register classes that are called during the mail delivery life cycle.
An interceptor class must implement the :delivering_email(message) method which will be called before the email is sent, allowing you to make modifications to the email before it hits the delivery agents. Your class should make any needed modifications directly to the passed in Mail::Message instance.
It can be useful for developers to send email to themselves not real users.
Example of registering an actionmailer interceptor:
# config/initializers/override_mail_recipient.rb

if Rails.env.development? or Rails.env.test?
  class OverrideMailRecipient
    def self.delivering_email(mail)
      mail.subject = 'This is dummy subject'
      mail.bcc = 'test_bcc@noemail.com'
      mail.to = 'test@noemail.com'
    end
  end
  ActionMailer::Base.register_interceptor(OverrideMailRecipient)
end
# Generate a Scheduled Newsletter
Create the Newsletter model:
Create the Newsletter controller:
After that, change the create.html.erb view to the nex name. We will convert this file to and partial view which will be stored inside the Footer. The name will be _form.html.erb.
After that set the routes:
Later on, we need to set the form we will use to save each mail:
And after that, insert on the footer:
Now, install the -letter_opener- to can preview email in the default browser instead of sending it. This means you do not need to set up email delivery in your development environment, and you no longer need to worry about accidentally sending a test email to someone else's address.
First add the gem to your development environment and run the bundle command to install it.
Then set the delivery method in the Development Environment:
Now, create an Mailer Structure to manage the whole mailers which we will work. In terminal
And inside the UserMailer, we have to create a method called Newsletter Mailer which will be created to contain inside on the lastest blog post and will be fired with a rake action. We will assume that you had a blog structure created before.
After that, create the Mailer Template:
Since we want to send the email as a separate process, let’s create a Rake task to fire off the email. Add a new file called email_tasks.rake to lib/tasks directory of your Rails application:
The send_digest_email: :environment means to load the Rails environment before running the task, so you can access the application classes (like UserMailer) within the task.
Now, running the command rake -T will list the newly created Rake task. Test everything works by running the task and checking whether the email is sent or not.
To test if the mailer method works, run the rake command:
At this point, we have a working rake task which can be scheduled using crontab. So we will install the Whenever Gem which is used to provide a clear syntax for writing and deploying cron jobs.
After that, run the next command to create an initial config/schedule.rb file for you (as long as the config folder is already present in your project).
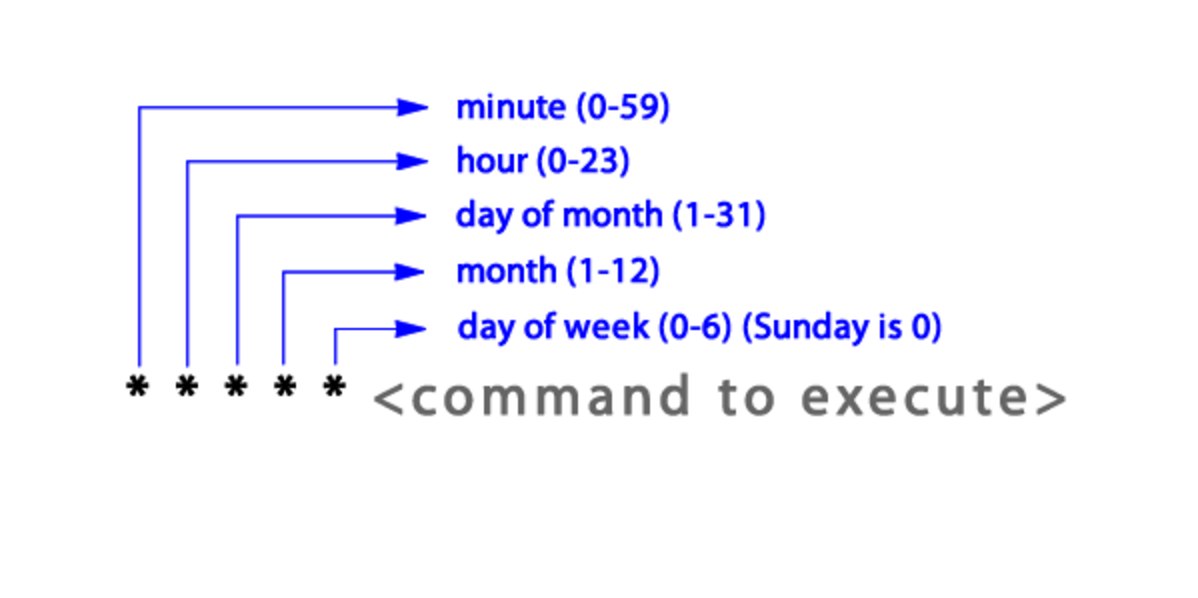
Now, inside the schedule file, we have to create our CRON JOB and call the mailer method inside determining the CRON JOB to operate some tasks without assistance and in a selected range of time. You can use different types of syntax as is explained on this link (opens new window).

Now to test the Cron Job was succesfully created we can use the next command to read since terminal, our scheduled job in CRON SYNTAX:
Now, to run the test in Development Environment, is wise to set the next line on the application.rb principal file to let the application knows where are the models it will use.
Now to let Capistrano V3 save the new Cron Job inside the server and the trigger which will fired up the execution of this task, we have to add the next requirement:
And insert into the deploy file the identifier which CRON JOB will use about the environment and the name of the application.
And ready, after save changes on each file, run the capistrano deploy command:
And now your JOB was created and calendarize to run the Mailer Method which is what i want and in the range of time we set on this files.
# Remarks
It is advisable to process the sending of email asynchronously so as not to tie up your web server. This can be done through various services such as delayed_job.